Implementing
Data Guard
General Concepts
Architecture
DataGuard Protection Modes
DataGuard Physical Implementation
DataGuard
Logical Implementation
Quick
Steps for creating the Physical Standby from a Hot backup
DataGuard Monitoring
Failover Steps
Switchover Steps
Implementation Tips
More Information
Applying Pacthes with Standby
General
Concepts
Oracle9i Data Guard is the
management, monitoring, and
automation software that work with a production database and one or
more
standby databases to protect data against failures, errors, and
corruption that
might otherwise destroy your database.
Data
Guard Components
Oracle9i Data Guard consists of the following
components:
A primary database is a production database. The primary database is used to create a standby database. Every standby database is associated with one and only one primary database.
Standby Database:
A physical or logical standby database is a database replica created from a backup of a primary database.
- A
physical standby database is
physically
identical to the primary database on a block-for-block basis. It's maintained in managed recovery mode to
remain current and can be set to read only; archive logs are copied and
applied.
- A logical standby database is logically identical to the primary database. It is updated using SQL statements.
Log transport services control the automated transfer of archived redo from the primary database to one or more standby sites.
Network Configuration:
The primary database is connected to one or more remote standby database via Oracle Net.
Log Apply Services:
Log apply services apply the archived redo logs to the standby database.
Data Guard Broker:
Data Guard Broker is the management and monitoring component with which you configure, control, and monitor a fault tolerant system consisting of a primary database protected by one or more standby database.

A database can operate in one of the two mutually
exclusive
roles: primary or standby database.
During a failover, one of the standby databases takes the primary database role.
Switchover
In Oracle9i, primary and standby database can continue to alternate roles. The primary database can switch the role to a standby database; and one of the standby databases can switch roles to become the primary.
Data
Guard Interfaces
SQL*Plus and SQL Statements
Using SQL*Plus and SQL commands to manage Data Guard environment. The following SQL statement initiates a switchover operation:
SQL> alter database commit to switchover to physical standby;
Data Guard Broker GUI Interface (Data Guard Manager)
Data Guard Manger is a GUI version of Data Guard broker interface that allows you to automate many of the tasks involved in configuring and monitoring a Data Guard environment.
Data Guard Broker Command-Line Interface (CLI)
It is an alternative interface to using the Data Guard Manger. It is useful if you want to use the broker from batch programs or scripts. You can perform most of the activities required to manage and monitor the Data Guard environment using the CLI.
The following example lists the available commands:
$ dgmgrl
Welcome to DGMGRL, type "help" for information.
DGMGRL> help
The following commands are available:
quit
exit
show See "help show" for syntax
enable See "help enable" for syntax
disable See "help disable" for syntax
help [<command>]
connect <user>/<password> [@<connect>]
alter See "help alter" for syntax
create See "help create" for syntax
remove See "help remove" for syntax
switchover See "help switchover" for syntax
failover See "help failover" for syntax
startup See "help startup" for syntax
shutdown See "help shutdown" for syntax
DGMGRL>
Note: The use of an SPFILE is required with Oracle9i Release 2 when using a Data Guard Broker Configuration.
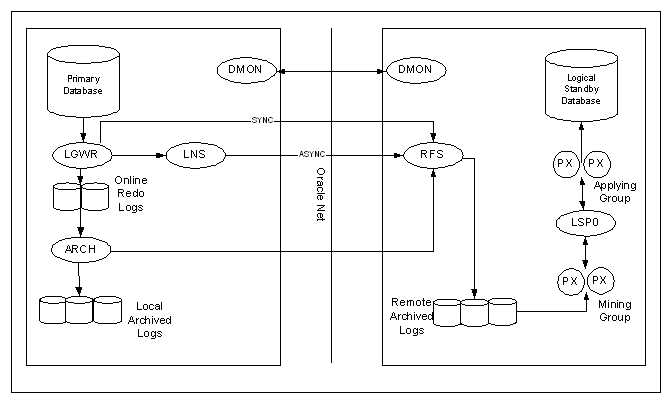
The log transport services and log apply services
use the
following processes to ship and apply redo logs to the physical standby
database:
On the primary database site, the log writer process (LGWR) collects transactions from the log buffer and writes to the online redo logs. The archiver process (ARCH) creates a copy of the online redo logs, and writes to the local archive destination. Depending on the configuration, the archiver process or log writer process can also transmit redo logs to standby database. When using the log writer process, you can specify synchronous or asynchronous network transmission of redo logs to remote destinations. Data Guard achieves synchronous network I/O using LGWR process. Data Guard achieves asynchronous network I/O using LGWR network server process (LNS). These network severs processes are deployed by LOG_ARCHIVE_DEST_n initialization parameter. Data Guard’s asynchronous log transport (i.e. the Maximum Performance mode) is recommended for a configuration in which the network distance is up to thousands of miles, providing continual maximum performance, while minimizing the risks of transaction loss in the event of a disaster.
On the standby database site, the remote file server process (RFS) receives archived redo logs from the primary database. The primary site launches the RFS process during the first log transfer. The redo logs information received by the RFS process can be stored as either standby redo logs or archived redo logs. Data Guard introduces the concept of standby redo logs (separate pool of log file groups). Standby redo logs must be archived by the ARCH process to the standby archived destination before the managed recovery process (MRP) applies redo log information to the standby database.
The fetch archive log
(FAL) client is the MRP process. The
fetch archive log (FAL) server is a
foreground process that runs on the primary database and services the
fetch
archive log requests coming from the FAL client. A
separate FAL server is created for each
incoming FAL client.
Thanks to the FAL_CLIENT and
FAL_SERVER parameters, the managed-recovery process in the physical
database will automatically check and resolve gaps at the time redo is
applied. This helps in the sense that you don't need to perform the
transfer of those gaps by yourselve.
When using Data Guard broker (dg_broker_start = true), the monitor agent process named Data Guard Broker Monitor (DMON) is running on every site (primary and standby) and maintain a two-way communication.

Logical
Standby Processes Architecture
The major difference between the
logical and
physical
standby database architectures is in its log apply services. On Logical Standby, you can query it while simultaneously
applying transactions from the primary. This is ideal for business that
requires a near real-time copy of your production DB for reporting.
The logical standby process (LSP) is the coordinator process for two groups of parallel execution process (PX) that work concurrently to read, prepare, build, and apply completed SQL transactions from the archived redo logs sent from the primary database. The first group of PX processes read log files and extract the SQL statements by using LogMiner technology; the second group of PX processes apply these extracted SQL transactions to the logical standby database. The mining and applying process occurs in parallel. Logical standby database does not use standby online redo logs. Logical standby database does not have FAL capabilities in Oracle9i. All gaps are resolved by the proactive gap resolution mechanism running on the primary that polls the standby to see if they have a gap.
Data
Protection Modes
Maximum
Protection:
It offers the highest level of data availability for the primary
database. Redo records are synchronously
transmitted from the primary database to the standby database using
LGWR
process. Transaction is not committed
on the primary database until it has been confirmed
that the
transaction data is available on at least one standby database. This mode is usually configured with at least
two standby databases. If all standby
databases become unavailable, it may result in primary instance
shutdown. This ensures that no data is
lost when the
primary database loses contact with all the standby databases. Standby online redo logs are required in this
mode. Therefore, logical standby
database cannot participate in a maximum protection configuration. This mode is similar to 9iR1’s guaranteed
mode. LGWR SYNC AFFIRM option
Maximum Availability: It offers the next highest level of data availability for the primary database. Redo records are synchronously transmitted from the primary database to the standby database using LGWR process. The transaction is not complete on the primary database until it has been confirmed that the transaction data is available on the standby database. If standby database becomes unavailable, it will not shut down the primary database. Instead, the protection mode is temporarily switched to maximum performance mode until the fault has been corrected and the standby database will re-synchronize with the primary database. This protection mode supports both physical and logical standby databases, and only available in Oracle9i release 2. LGWR SYNC AFFIRM option
Maximum Performance: It is the default protection mode. It offers slightly less primary database protection than maximum availability mode but with higher performance. Redo logs are asynchronously shipped from the primary database to the standby database using either LGWR or ARCH process. When operating in this mode, the primary database continues its transaction processing without regard to data availability on any standby databases and there is little or no effect on performance. This protection mode is similar to the combination of 9iR1’s Instance, Rapid, and Delay modes. It supports both physical and logical standby databases. LGWR ASYNC AFFIRM or NOAFFIRM option
|
Mode |
Log Writing Process |
Network Trans Mode |
Disk Write Option |
Redo Log Reception Option |
Supported on |
|
Maximum Protection |
LGWR |
SYNC |
AFFIRM |
Standby redo logs are required |
Physical standby databases |
|
Maximum Availability |
LGWR |
SYNC |
AFFIRM |
Standby redo logs |
Physical and logical standby databases |
|
Maximum Performance |
LGWR or ARCH |
ASYNC if LGWR |
NOAFFIRM |
Standby redo logs |
Physical and logical standby databases |
These can be found in the Oracle documentation in Chapter 5 of the Data
Guard Concepts and Administration Manual.
• AFFIRM assures that archive
logs are written to disk, primary or
standby.
• MANDATORY assures that redo
logs are not overwritten until archive
logs are successfully created. This should only apply to the
primary database.
• REOPEN=30 means that there
will be a 30 second delay until ARCn
and/or LGWR processes try again on a MANDATORY destination which failed.
• DELAY is in minutes and
does not stop the copy of an archive log file
to a standby server but the application of redo on the standby after
copying the archive log to the standby. This will not help primary
database performance.
• Using ARCH instead of LGWR for the second standby
database may help
primary database performance but smaller sized log files would probably
be required. SYNC=PARALLEL applies to LGWR only. Using ARCH waits for a
switch on the primary, LGWR copies entries to a standby archive log,
applied only at switch. ARCH will copy and apply at switch. LGWR is
more efficient since it writes redo entries to all standby databases at
once but a primary and two standby databases could possibly cause a
performance issue for the primary database, possibly but unlikely!
Additionally multiple archiver processes can be created on the primary
database. Increase the value of the LOG_ARCHIVE_MAX_PROCESSES parameter
to start additional archiver processes. The default on my machine
appears to be 2 and not 1 as stated in the manuals; probably because I
have two standby databases.
• The ARCHIVE_LAG_TARGET
parameter could be used to increase the
frequency of log switches, thus sending less data to the standby
databases more often. Specifies the maximum number of seconds between
each log switch, so it will force a log switch when that number in
seconds is reached.
Now let’s check for objects and attributes which are unsupported on a
logical standby database. Application objects such as tables could be a
problem.
SELECT * FROM DBA_LOGSTDBY_UNSUPPORTED ORDER BY owner,table_name,column_name;
Now check for missing primary keys. Application tables without unique
primary keys will require them, as rows will not be identifiable in the
logical standby database for update by SQL Apply. Drop any objects
listed or create primary keys for them.
SELECT OWNER, TABLE_NAME, BAD_COLUMN
FROM DBA_LOGSTDBY_NOT_UNIQUE;
Using Data
Guard Redo Apply in a LAN the following is recommended:
• Use Maximum Protection or Maximum Availability modes for zero data
loss; the performance impact was less than 3% in all synchronous tests.
With a single remote archive destination, use the NOPARALLEL option
(“lgwr sync=noparallel”).
• For very good performance and a minimal risk of transaction loss in
the event of a disaster, use Maximum Performance mode, with LGWR ASYNC
and a 10 MB async buffer (ASYNC=20480). LGWR ASYNC performance degraded
no more than 1% as compared to using the ARCH transport. LGWR ASYNC
also bounds the risk of potential transaction loss much better than the
ARCH transport. The 10 MB async buffer outperformed smaller buffer
sizes and reduced the chance of network timeout errors in a high
latency / low bandwidth network.
Metropolitan
and Wide Area Network
Data Guard is used across a metropolitan area networks (MAN) or WANs to
get complete disaster recovery protection. Typically a MAN covers
a large metropolitan area and has network Round-Trip-Times (RTT) from
2-10 ms. For the MAN/WAN tests, different network RTT’s were simulated
during testing to measure the impact of the RTT on the primary database
performance. The tests were conducted for the following RTT’s: 2 ms
(MAN), 10 ms, 50 ms, and 100 ms (WAN) Additionally, tests using Secure
Shell (SSH) port forwarding with compression were also done for
different RTT’s.
Best practices recommendations are:
• Use Maximum Protection and Maximum Availability modes over a MAN for
zero data loss. For these modes, the network RTT overhead over a WAN
can impact response time and throughput of the primary database. The
performance impact was less than 6% with a 10 ms network RTT and a high
transaction rate.
• For very good performance and a minimal risk of transaction loss in
the event of a disaster, use Maximum Performance mode, with LGWR ASYNC
and a 10 MB async buffer (ASYNC=20480). LGWR SYNC performance degraded
no more than 2% as compared to remote archiving. The 10 MB async buffer
outperformed smaller buffer sizes and reduced the chance of network
timeout errors in a high latency / low bandwidth network.
• For optimal primary database performance throughput, use remote
archiving (i.e. the ARCH process as the log transport). This
configuration is best used when network bandwidth is limited and when
your applications can risk some transaction loss in the event of a
disaster.
• If you have sufficient memory, then set the TCP send and receive
buffer sizes (these affect the advertised TCP window sizes) to the
bandwidth delay product, the bandwidth times the network round trip
time. This can improve transfer time to the standby by as much as 10
times, especially with the ARCH transport.
• Set SDU=32768 (32K) for the Oracle Net connections between the
primary and standby. Setting the Oracle network services session data
unit (SDU) to its maximum setting of 32K resulted in a 5% throughput
improvement over the default setting of 2048 (2K) for LGWR ASYNC
transport services and a 10% improvement for the LGWR SYNC transport
service.
• Use SSH port forwarding with compression for WAN’s with a large RTT
when using maximum performance mode. Do not use SSH with compression
for Maximum Protection and Maximum Availability modes since it
adversely affected the primary throughput. Using SSH port forwarding
with compression reduced the network traffic by 23-60% at a 3-6%
increase in CPU usage. This also eliminated network timeout errors.
With the ARCH transport, using SSH also reduced the log transfer time
for RTT’s of 50 ms or greater. For RTT’s of 10ms or less, the ARCH
transport log transfer time was increased when using SSH with
compression.
This is achieved by using the following command syntax executed on the
primary database.
ALTER DATABASE SET STANDBY DATABASE TO MAXIMIZE
{ PROTECTION | AVAILABILITY | PERFORMANCE };
The protection mode can be found by executing this query. PERFORMANCE
is the default.
SELECT name, protection_mode,
protection_level FROM v$database;
--------- -------------------- --------------------
STBY MAXIMUM PERFORMANCE MAXIMUM
PERFORMANCE
-Minimal Data Loss. The AVAILABILITY mode prevents a transaction
committing on the primary until all redo entries are written to at
least one standby database. SYNC transport is required and this option
is available to both logical and physical standby type databases.
Unlike PROTECTION mode, which shuts down the primary database in the
event of failure to pass redo entries to the standby, this mode simply
lowers the protection mode to PERFORMANCE until the error is corrected.
- No Data Divergence. PERFORMANCE mode is the default setting and
available for both physical and logical standby type databases. A
transaction will commit to the primary before all redo entries are
written to any standby database.
To ensure that minimal data loss will be encountered execute this
command on the primary database. The database must be in mounted
exclusive mode to execute this command.
ALTER DATABASE SET STANDBY DATABASE
TO MAXIMIZE AVAILABILITY;
PHysical
Data
Guard Implementation
- Using Oracle9i Data Guard broker.
- Manual configuration of a Data Guard environment.
The following shows how to set up Data Guard in this given environment:
2. One primary database instance called FGUARD on host server1; one physical standby database instance called FGUARD on host server2.
3. Listener listener is on host server1, and pointed by TNS entry FGUARD
4. Listener listener is on host server2, and pointed by TNS entry FGUARD.
5. The purpose of TNS entry FGUARD and FGUARD are used for LGWR/ARCH process to ship redo logs to the standby site, and for FAL process to fetch redo logs from the primary site.
6. Since Data Guard broker is not used here, we set dg_broker_start to false.
7. The protection mode is set to best performance. Therefore, only local archive destination (log_archive_dest_1) is set to mandatory; the standby archive destination (log_archive_dest_2) is set to optional for LGWR process, with network transmission method of asynchronous and disk write option of no affirm. 8. The standby site is not using standby online redo logs. Therefore, the redo log reception option is archived logs.
Section 1: Site Information
Primary Site:
Database Name: FGUARD
Primary Server : server_01
Primary Instance Name: FGUARD
Primary Listener: LISTENER
Recovery Database: DR_FGUARD
Standby Site:
Database Name: FGUARD
Standby Server: server_02
Standby Instance name: FGUARD
Standby Listener: LISTENER
Production DB: PROD_FGUARD
Section 2: Oratab /etc/oratab entry:
| Primary Site: | Standby Site: |
| FGUARD:/u01/app/oracle/product/9.2.0:Y | FGUARD:/u01/app/oracle/product/9.2.0:N |
Section 3: Parameter file
Primary init.ora file:
db_name = FGUARD
#fal_server = DR_FGUARD #PROD DB
#fal_client = FGUARD #this DB
log_archive_dest_1 = 'LOCATION=/u02/arch/PROD MANDATORY'
log_archive_dest_2 = 'SERVICE=DR_FGUARD reopen=60'
log_archive_dest_state_1 = 'enable'
log_archive_dest_state_2 = 'enable'
log_archive_format = 'arch_t%t_s%s.dbf'
log_archive_start = true (not used on 10g)
standby_archive_dest = '/oracle/arch'
standby_file_management ='AUTO' #If not auto, newly created tablespaces in a standby environment must be recreated manually and newly added datafiles must be copied to the standby servers as well.
remote_archive_enable = true
dg_broker_start = true
Optional parameters:
log_archive_dest_2='service=stby lgwr sync affirm mandatory reopen=180'
LOG_ARCHIVE_DEST_2 - Specifies the net service name of the standby database (check tnsnames.ora on primary database).You can either per destination use LGWR or ARCH, due to network traffic it is advised to use LGWR for at most one remote destination.Also the network transmission mode (sync or async) has to be specified in case primary database modifications are propagated by the LGWR. The NO DATA LOSS situation demands the SYNC mode, control is not returned to the executing application or user until the redo information is received by the standby site (this can have impact on the performance as mentioned).
Standby init.ora file:
db_name = FGUARD
fal_server = PROD_FGUARD #PROD DB
fal_client = FGUARD #this DB
log_archive_dest_1 = 'LOCATION=/oracle/arch MANDATORY'
#log_archive_dest_2 = 'SERVICE=PROD_FGUARD reopen=60'
log_archive_dest_state_1 = 'enable'
#log_archive_dest_state_2 = 'enable'
log_archive_format = 'arch_t%t_s%s.dbf'
log_archive_start = true (not used on 10g)
standby_archive_dest = '/oracle/arch'
remote_archive_enable = true
standby_file_management ='AUTO'
dg_broker_start = true
Optional Parameters:
db_file_name_convert=('/disk1/oracle/oradata/payroll/','/disk1/oracle/oradata/payroll/standby/')
log_file_name_convert=('/disk1/oracle/oradata/payroll/','/disk1/oracle/oradata/payroll/standby/')
DB_FILE_NAME_CONVERT - Specifies the location of datafiles on standby database.The two arguments that this parameter needs are: location of datafiles on primary database , location of datafiles on standby database. This parameter will convert the filename of the primary database datafiles to the filename of the standby datafile filenames. If the standby database is on the same system as the primary database or if the directory structure where the datafiles are located on the standby site is different from the primary site then this parameter is required. See Section 3.2.1 for the location of the datafiles on the primary database.
LOG_FILE_NAME_CONVERT - Specifies the location of redo logfiles on standby database.The two arguments that this parameter needs are: location of redo logfiles on primary database , location of redo logfiles on standby database. This parameter will convert the filename of the primary database log to the filenames of the standby log. If the standby database is on the same system as the primary database or if the directory structure where the logs are located on the standby site is different from the primary site then this parameter is required.
Section 4: Listener.ora file
| Primary Site: | Standby Site: |
| FGUARD = (DESCRIPTION = (ADDRESS_LIST = (ADDRESS = (PROTOCOL = TCP)(HOST = server1)(PORT = 1521)) ) (CONNECT_DATA = (SERVER = DEDICATED) (SERVICE_NAME = FGUARD) ) ) DR_FGUARD = (DESCRIPTION = (ADDRESS_LIST = (ADDRESS = (PROTOCOL = TCP)(HOST = server2)(PORT = 1521)) ) (CONNECT_DATA = (SERVER = DEDICATED) (SERVICE_NAME = FGUARD) ) ) |
FGUARD= (DESCRIPTION = (ADDRESS_LIST = (ADDRESS = (PROTOCOL = TCP)(HOST = server2)(PORT = 1521)) ) (CONNECT_DATA = (SERVER = DEDICATED) (SERVICE_NAME = FGUARD) ) ) PROD_FGUARD = (DESCRIPTION = (ADDRESS_LIST = (ADDRESS = (PROTOCOL = TCP)(HOST = server1)(PORT = 1521)) ) (CONNECT_DATA = (SERVER = DEDICATED) (SID = FGUARD) ) ) |
Step
1: The Preparation
If Archive Log Mode is not enabled for your primary database, enable it using the following. First, you will need to define the following instance variables:
log_archive_dest_1 = 'LOCATION=/oracle/arch MANDATORY'
log_archive_dest_state_1 = 'enable'
log_archive_format = 'arch_t%t_s%s.dbf'
log_archive_start = true (not used on 10g)
Put those parameters into the spfile and startup the database. Next, place the primary database in archive log mode:
SQL> shutdown immediate;
SQL> create spfile from pfile;
SQL> startup mount;
SQL> alter database archivelog;
SQL> alter database open;
To check that everything is OK, perform the following:
SQL> alter system switch logfile;
- Choose the proper redo log size and groups
- Choose the proper protection mode
- Enable Forced Logging.
The following step is optional but highly recommended as it could save the DBA considerable time when disaster recovery needs to be implemented and you have operations that are performing nologging operations
You should place the primary database in FORCE LOGGING mode
SQL> alter database force logging;
NOTE: In the above example db_file_name_convert and log_file_name_convert are not needed as the directory structure on the two hosts are the same. If the directory structure is not the same then setting of these parameters is recommended. Please reference ML notes 47325.1 and 47343.1 for further information.
Note here that the Primary init.ora on the Standby host to have log_archive_dest_2 use the alias that points to the Primary host. You must modify the Standby init.ora on the standby host to have fal_server and fal_client use the aliases when standby is running on the Primary host.
· Setup the tnsnames.ora and listener.ora file for both primary and standby databases. (see section 4)
Step
2: Backup
the
primary Database Datafiles
· Backup the primary database datafiles and online redo logs. A backup of the online redo logs is necessary to facilitate switchover.
or
select 'cp ' || name || ' /oracle/BCKUP' from v$datafile
UNION
select 'cp ' || member || ' /oracle/BCKUP' from v$logfile;
Step
3: Create the Physical standby Database Control File
NOTE: The controlfile must be created after the last time stamp for the backup datafiles.
Step
4: Transfer the Datafiles and Control File to the Standby Site
Step
5: Start the Listeners on both Primary and Standby Site
Step
6: Start the Standby Database (Primary Database already running)
If the standby is on a separate site with the same directory structure as the primary database then you can use the same path names for the standby files as the primary files. In this way, you do not have to rename the primary datafiles in the standby control file.
If the standby is on the same site as the primary database, or the standby database is on a separate site with a different directory structure the you must rename the primary datafiles in the standby control file after copying them to the standby site. This can be done using the db_file_name_convert and log_file_name_convert parameters or by manually using the alter database statements. If the directory structure is not the same then reference notes 47325.1 and 47343.1 for further information.
If you decided to rename them manually, you MUST use ALTER DATABASE RENAME FILE <oldname> TO <newname> after the standby database is mounted to rename the database files and redo log files..
If needed, copy the Standby Controlfile that your created FROM the production DB to the appropiate location on the standby DB according your init.ora file
$ cd
$ cp standby.ctl /u03/app/oradata/FGUARD/control01.ctl
$ cp standby.ctl /u04/app/oradata/FGUARD/control02.ctl
$ cp standby.ctl /u05/app/oradata/FGUARD/control03.ctl
· Connect as sysdba.
· Bring the database in nomount mode first.
Create standby redo log files, if necessary:
Standby redo logs are necessary for the higher protection levels such as Guaranteed, Instant, and Rapid. In these protection modes LGWR from the Primary host writes transactions directly to the standby redo logs. This enables no data loss solutions and reduces the amount of data loss in the event of failure. Standby redo logs are not necessary if you are using the delayed protection mode
If you configure standby redo on the standby then you should also configure standby redo logs on the primary database. Even though the standby redo logs are not used when the database is running in the primary role, configuring the standby redo logs on the primary database is recommended in preparation for an eventual switchover operation
Standby redo logs must be archived before the data can be applied to the standby database. The standby archival operation occurs automatically, even if the standby database is not in ARCHIVELOG mode. However, the archiver process must be started on the standby database. Note that the use of the archiver process (ARCn) is a requirement for selection of a standby redo log
You must have the same number of standby redo logs on the standby as you have online redo logs on production. They must also be exactly the same size
The following syntax is used to create standby redo logs:
SQL> alter database add standby logfile '/export/home/oracle/temp/oracle/data/srl_1.dbf' size 20m;
SQL> alter database add standby logfile '/export/home/oracle/temp/oracle/data/srl_2.dbf' size 20m;
SQL> alter database add standby logfile '/export/home/oracle/temp/oracle/data/srl_3.dbf' size 20m;
Step
7: Place the Standby Database in Managed Recovery Mode
NOTE: The example includes the DISCONNECT FROM SESSION option so that log apply services run in a background session. This option is new in Oracle9i
Step
8: Monitor the Log Transport services and Log Apply Services
or
SQL> alter system archive log current;
· Check the standby alert log file to see if the new logs have applied to the standby database.
from v$managed_standby;
or
select sequence#, first_time, next_time
from v$archived_log order by sequence#;
From the standby database, query the V$ARCHIVED_LOG view to verify the archived redo log was applied.
select sequence#, archived, applied
from v$archived_log order by sequence#;
SEQUENCE# ARCHIVED APPLIED
---------- -------- -------
115 YES YES
116 YES YES
LOGICAL Data Guard Implementation
There are two ways to configure a Data Guard environment.
Step 1. Enable logging. On your primary database, instruct Oracle Database to force all logging of changes to the redo, even if nologging or unrecoverable data loads are performed:
SQL> alter database force logging;
Verify that forced logging has been enabled on your primary database, by issuing the following:
SQL> select force_logging from v$database;
Step 2. Create a password file for the primary database. Every database in a Data Guard environment must use a password file. Additionally, the password used by SYS must be the same for all primary and standby databases. On your primary database server, navigate to ORACLE_HOME/dbs and issue the following command:
$ orapwd file=orapw<sid_name> password=top_secret
Also, instruct Oracle Database to use the newly created password file, by setting the init.ora/spfile remote_login_ passwordfile parameter to either EXCLUSIVE or SHARED.
Step 3.
Configure the primary database init.ora/spfile.
If you are using an spfile, you may find it easier to switch to using
an init.ora file while implementing your logical standby. After
implementation, you can easily switch back to using an spfile. In
this example, BRDSTN is the
database name of both the primary and the standby. Primarydb is the Oracle Net service name of the primary
database, and standbydb is the
Oracle Net service name of the standby database.
db_name=BRDSTN
db_unique_name=primarydb

# dg_config specifies unique Oracle Net service names in Data Guard environment
log_archive_config='dg_config=(primarydb, standbydb)'
log_archive_dest_1='location=/orarchive/BRDSTN db_unique_name=primarydb'
log_archive_dest_2='service=standbydb valid_for=(online_logfiles,primary_role) db_unique_name=standbydb'
log_archive_dest_state_1=enable
log_archive_dest_state_2=enable
remote_login_password=exclusive

# Enable automatic propagation of data file operations
standby_file_management=auto
Step 4. Enable archiving. Ensure that your primary database is in archive log mode:
SQL> archive log list;
If archiving hasn't been enabled on your primary database, run the following:
SQL> shutdown immediate;
SQL> startup mount;
SQL> alter database archivelog;
SQL> alter database open;
Note that the LOG_ARCHIVE_START initialization parameter is obsolete in Oracle Database 10g. Archiving is automatically enabled when you put your database into archive log mode.
Step 5. Put a primary key on every replicated table. The SQL Apply process must be able to match rows changing in the primary database to the corresponding rows changing in the standby database. SQL Apply can't use a rowid, because it can be different between the two databases. Therefore, each table being replicated to a logical standby database must have a primary or unique key defined.
To identify tables that have rows that cannot be uniquely identified, query the DBA_LOGSTDBY_NOT_UNIQUE view.
Step 6. Enable supplemental logging. Enabling supplemental logging will direct Oracle Database to add a small amount of extra information to the redo stream. The SQL Apply process uses this additional information to maintain tables being replicated. On your primary database, enable supplemental logging as follows:
SQL> alter database add supplemental log data (primary key, unique index) columns;
SQL> alter system archive log current;
You can verify that supplemental logging has been enabled, by issuing the following on your primary database:
SQL> select supplemental_log_data_pk, supplemental_log_data_ui from v$database;
Step 7. Take a backup of your primary database, and move it to the standby machine. Take an offline or online backup of your primary database and copy it to your standby server. You need to back up and copy only data files, not online redo files or controlfiles.
Step 8. Create a logical standby controlfile. You must create a special logical standby database controlfile and then copy it to your standby machine. On your primary database, issue the following SQL:
SQL> alter database create logical standby controlfile as '/ora01/oradata/BRDSTN/sb.ctl';
Note the use of the keyword logical; it's critical to use the correct syntax.
After creating the logical standby
controlfile,
copy it to your standby machine. In this example, the standby
controlfile must be placed in the /ora01/ oradata/BRDSTN directory on
the standby machine
Step 9.
Create init.ora for logical standby.
Copy the primary init.ora file to the standby machine, and then make
the necessary modifications for your logical standby database, as shown
HERE:
#  Change db_unique_name to standby Oracle Net name
db_unique_name=standbydb

# In the archive destination, change db_unique_name to standby Oracle Net name
log_archive_dest_1='location=/orarchive/BRDSTN db_unique_name=standbydb'

# Specify where arriving archive redo should be placed
standby_archive_dest=/orarchive/BRDSTN

# If you have a new controlfile name, change it here
control_files=/ora01/oradata/BRDSTN/sb.ctl

# FAL parameters facilitate initial LS setup, but are not required after setup
fal_server=primarydb
fal_client=standbydb

# Oracle recommends setting this minimally to 9
parallel_max_servers=9
Step 10. Create a password file for the logical standby database. As noted in Step 2, every Oracle Data Guard-enabled database needs a password file using the same password. On your standby machine, go to ORACLE_HOME/dbs and issue the following command:
$ orapwd file=orapw<sid_name> password=top_secret
Step 11. Configure Oracle Net for primary and standby databases. The primary and logical standby databases need to communicate with each other via Oracle Net. Ensure that both the primary and the logical standby databases have listeners and that the appropriate Oracle Net service information is in place. Here are examples of the entries in the tnsnames.ora file on both the primary and the standby servers:
primarydb =
(DESCRIPTION=
 (ADDRESS=(PROTOCOL=tcp) (PORT=1521) (HOST=primary_host))
 (CONNECT_DATA=(SERVICE_NAME=BRDSTN)))

standbydb=
(DESCRIPTION=
 (ADDRESS=(PROTOCOL=tcp) (PORT=1521) (HOST=standby_host))
 (CONNECT_DATA=(SERVICE_NAME=BRDSTN)))
Also, Oracle recommends enabling dead connection detection by the setting of sqlnet.expire_time to one minute in your sqlnet.ora file, as shown:
sqlnet.expire_time=1
Step 12. Start up and activate the logical standby database. On your logical standby server, start up and activate your logical standby database, as follows:
SQL> startup mount;
SQL> alter database
recover managed standby database;
You may need to give the above ALTER command a few minutes to complete. When it is finished, you can activate your standby database as follows:
SQL> alter database activate standby database;
Step 13. Rename your logical standby database. Renaming your logical standby database is not a required step. However, Oracle recommends renaming your logical standby database to ensure that the logical standby is never confused with the primary database.
Use the nid utility to reset the name of your logical standby database. Before running nid, shut down and start up your database in mount mode.
SQL> shutdown immediate;
SQL> startup mount;

$ nid target=sys/top_secret dbname=BRDLS
In this example, BRDLS is the new name of your logical standby database. You should now see the following line prompting you:
Change database ID and database name BRDSTN to BRDLS? (Y/[N]) =>
Enter Y and a return. At this point, you should see at the bottom of the message text:
DBNEWID - Completed successfully.
Step 14. Change the logical standby db_name in the init.ora file. Now you need to change the db_name initialization parameter. For example, in your logical standby database init.ora file, make this change:
db_name=BRDLS
Step 15. Re-create the password file for the logical standby database. After running the nid utility, you need to re-create your logical standby password file. To do this, navigate to ORACLE_HOME/dbs, remove the old password file, and issue the following OS command:
$ orapwd file=orapw<sid_name> password=top_secret
Step 16. Open the logical standby database with resetlogs. You can now make your logical standby database accessible. Start up your database, and open it with the RESETLOGS command, as follows:
SQL> startup mount;
SQL> alter database open resetlogs;
Step 17. Add temp files to the logical standby database. You'll need a temp tablespace in your logical database if you plan to do any reporting or if you ever transition the logical standby database to a primary database role. Add the temp file(s) to the logical standby as they existed on the primary database:
SQL> alter session disable guard;
SQL> alter tablespace temp add tempfile '/ora01/oradata/BRDSTN/temp01.dbf'
size 500M reuse;
SQL> alter session enable guard;
Step 18. Restart the logical standby database SQL Apply process. All you need to do now is restart the SQL Apply process on your logical standby database:
SQL> alter database start logical standby apply;
You now have a fully functioning logical standby database.
Quick Steps for Creating the Standby from Hot Backup
At PROD Site
put proper values on the primary db using "alter system set...... "
create pfile from spfile;
alter system switch logfile;
alter system archive log current;
perform hot backup
select 'cp ' || name || ' /oracle/BCKUP' from v$datafile
UNION
select 'cp ' || member || ' /oracle/BCKUP' from v$logfile;
compress files
copy compresses files to standby site
...
alter database create standby controlfile as '/mnt/oracle/ctrlfile.bin';
alter database create controlfile to trace;
transfer init.ora, passwd and ctrlfile.bin files to standby DB
At standby site:
copy *.dbf, *log, ctrlfile.bin and *.ora to proper locations
modify init.ora file containing correct information (like udump, contrl file, etc)
Use if needed db_file_name_convert=('/opt/oracle/product/10.1.0/db_1/oradata/FGUARD/','/data/oradata/FGUARD/')
log_file_name_convert=('/opt/oracle/product/10.1.0/db_1/oradata/FGUARD/','/data/oradata/FGUARD/')
sqlplus "/ as sysdba"
create spfile from pfile;
startup nomount;
alter database mount standby database;
recover standby database;
recover managed standby database;
--On the standby, Get the sequence number of the
last applied archive log.
select max(sequence#)
Last_applied_arch_log from
v$archived_log where
applied='YES';
-- On the standby, Get the sequence
number of the
-- This is the last log the standby can apply without receiving
-- additional archive logs from the primary.
SELECT
min(sequence#) Last_archive_log_received FROM
v$archived_log
WHERE
(sequence#+1) NOT IN (SELECT sequence# FROM v$archived_log)
AND
sequence# > &Last_applied_arch_log;
--Connect
to the primary database and obtain the sequence number of the current online
log:
select sequence# from v$log
where status='CURRENT';
-- The difference between 2nd query
and 1st
query should be 0
-- The difference between 3d query and
1st query is the number of archive logs
that the standby
-- database
would not be able to recover
if the primary host become unavailable
Another Method
Use the following SQL on the standby database (the database must be
mounted).
SELECT high.thread#, "LowGap#","HighGap#"
FROM (SELECT thread#, MIN(sequence#)-1 "HighGap#"
FROM (SELECT
a.thread#, a.sequence#
FROM ( SELECT *
FROM v$archived_log) a,
(SELECT thread#, MAX(next_change#) gap1
FROM v$log_history
GROUP BY thread#) b
WHERE a.thread# = b.thread#
AND a.next_change# > gap1
)
GROUP BY
thread#
) high,
(SELECT thread#, MIN(sequence#)
"LowGap#"
FROM ( SELECT thread#,
sequence#
FROM v$log_history, v$datafile
WHERE checkpoint_change# <= next_change#
AND checkpoint_change# >= first_change#
)
GROUP BY thread#) low
WHERE low.thread# = high.thread#;
After failover operation, you need to modify TNS entry for ‘prod’ to point to the new instance and host name (see next section: Switchover Step 7).
For the purpose of the following list, let's pretend the master server
is called PROD_01 and the standby server STDBY_PROD. In a nutshell,
these are the steps involved.
1. STDBY_PROD -- Suspend recovery
on the standby site.
2. PROD_01 -- Suspend log
shipping from the master to the standby site.
3. PROD_01 -- Perform one or more
log switches on the master using alter system switch logfile; commands.
4. PROD_01 -- Note the log
sequence numbers generated on the master.
5. PROD_01 -- Shutdown the master
using the immediate option.
6. PROD_01 -- Ship the archived
redo logs to the standby site.
7. STDBY_PROD -- Apply those
archived redo to the standby instance.
8. STDBY_PROD -- Shutdown the
standby using the immediate option.
9. PROD_01 -- Ship a copy of the
master control files to the standby site positioned in the proper
location.
10. PROD_01 -- Ship a copy of the
master's online redo logs to the standby site positioned in the proper
location.
11. STDBY_PROD -- Startup the new
master database.
12. STDBY_PROD -- Create a new
standby control file.
13. PROD_01 -- Get that new
standby control file and position properly.
14. PROD_01 -- Startup mount
(standby) the new standby to verify it is OK.
15. PROD_01 -- Shutdown the
standby using the immediate option.
In this FULL Example, the
old standby database (prod_02)
becomes the new primary, and the old primary (prod_01) becomes
the new
standby database.
· End all activities on the primary and standby database
· Check primary database switchover status
------------------------- -----------------------------------
PRIMARY TO STANDBY
Step 2: Shutdown the primary database and bring up as the new standby database
· Shutdown the primary database normally
- fal_client = “prod_01”
SQL> alter database mount standby database;
Step 3: Switchover preparation for the former standby database
· Check standby database switchover status
DATABASE_ROLE SWITCHOVER_STATUS
------------------------- -----------------------------------
PHYSICAL STANDBY TO PRIMARY
Step 4: Shutdown the standby database and bring up as the new primary database
· Shutdown the standby database
- fal_client = “prod_02”
- Add parameters log_archive_dest_2 and log_archive_dest_state_2
Step 5: Add Temp Tablespace
· Issue the following command to add TEMP tablespace
SIZE 3072M reuse AUTOEXTEND OFF;
Step 6: Put the new standby database in managed recovery mode
· Issue the following command on the new standby database.
Step 7: Change TNS Entry for the New Primary Database
· Change the TNS entry on all application hosts to point to the new primary
(description =
(address = (protocol = tcp) (host = server_02) (port = 1522)
(connect_data = (sid = prod_02))
)
Tip #1: Primary Online Redo Logs
The number of redo groups and the size of redo logs are two key factors in configuring online redo logs. In general, you try to create the fewest groups possible without hampering the log writer process’s ability to write redo log information. In a Data Guard environment, LGWR process may take longer to write to the remote standby sites, you may need to add additional groups to guarantee that a recycled group is always available to the log writer process. Otherwise, you may receive incomplete logs on the standby sites. The size of redo log is determined by the amount of transaction needed to be applied to a standby database during database failover operation. A small size of redo will minimize the standby database lag time; however, it may cause more frequent log switches and require more redo groups for log switches to occur smoothly. On the other hand, large size redo logs may require few groups and less log switches, but it may increase standby database lag time and potential for more data loss. The best way to determine if the current configuration is satisfactory is to examine the contents of the log writer process’s trace file and the database’s alert log.
For example, the following message from the alert log may indicate a need for more log groups.
ORA-00394: online log reused while attempting to archive it
Tip #2: Standby Online Redo Logs vs. Standby Archived Redo logs
Online redo logs transferred from the primary database are stored as either standby redo logs or archived redo logs. Which redo log reception option should we choose? Here is the comparison chart:
| |
Standby Online Redo Logs | Standby Archived Redo Logs |
| Advantages | -
Pre-allocated files - Can place on raw devices - Can be duplexed for more protection - Improve redo data availability - No Data Loss capable |
-
No extra ARCH process - Reduce lag time |
Tip #3: Enforce Logging
Enforce Logging is a new feature in Oracle9i Release 2, it is recommended that you set the FORCE LOGGING clause to force redo log to be generated for individual database objects set to NOLOGGING. This is required for a no data loss strategy.
Here is the SQL command to set FORCE LOGGING:
SQL> select force_logging from v$database;
FORCE_LOGGING
--------------
NO
SQL> alter database force logging;
Tip #4: RMAN Backup
A failover operation reset logs for the new primary. If you use RMAN to backup your database, you need to create a new incarnation of the target database. Otherwise, your RMAN backup will fail.
RMAN> reset database;
Tip #5: Disable Log Transport Services When Standby Database is down
When a standby database or host is down for maintenance, it is advisable to temporarily disable the log transport services for that site. Especially during a heavily transaction period, one behavior observed in Oracle9i R1 is that when one of the standby database is down for maintenance, it can temporarily freeze the primary database even the data protection mode is set to rapid mode. To avoid such problem, you can issue this command on the primary database before bring down the standby database:
SQL> alter system set log_archive_dest_state_2 = defer;
When the standby database is up again, issue:
SQL> alter system set log_archive_dest_state_2 = enable;
Tip #6: Standby Database Upgrade
Steps to upgrade standby database to newer database version:
Step 1: Shutdown both primary and standby databases
Step 2: Install Oracle9i software on both primary and standby hosts
Step 3: Upgrade the primary database
Step 4: Rebuild standby database from the upgraded primary
Tip #7: Data Guard Broker
Oracle9i Release 1 broker configuration supported only one primary site and one physical standby site. The first release of broker is not so user friendly with limited features.
Oracle9i Release 2 broker has made great improvements. The new configuration now support up to nine standby sites (including logical standby database). Both Data Guard Manager and CLI support switchover and failover operations. You must upgrade to Oracle Enterprise Manager Release 9.2 to managed broker configuration running Data Guard Release 2.
Tip #8: Using ‘Delay’ Option to Protect Logical/Physical Corruptions
You may utilize the delay option (if you have multiple standby sites) to prevent physical/logical corruption of your primary. For instance, your standby #1 may not have ‘Delay’ on to be your disaster recovery standby database. However, you may opt to implement a delay of minutes or hours on your standby #2 to allow recover from a possible physical or logical corruption on your primary database.
SQL> alter database recover managed standby database delay 5 disconnect;
Tip #9: Always monitor log apply services and Check Alert. log file for errors.
If you are not using Data Guard broker, here is a script to help you to monitor your standby database recover process:
$ cat ckalertlog.sh
####################################################################
## ckalertlog.sh ##
####################################################################
#!/bin/ksh
export EDITOR=vi
export ORACLE_BASE=/u01/app/oracle
export ORACLE_HOME=$ORACLE_BASE/product/9.2.0
export ORACLE_HOME LD_LIBRARY_PATH=$ORACLE_HOME/lib
export TNS_ADMIN=/var/opt/oracle
export ORATAB=/var/opt/oracle/oratab
PATH=$PATH:$ORACLE_HOME:$ORACLE_HOME/bin:/usr/ccs/bin:/bin:/usr/bin:/usr/sbin:/
sbin:/usr/openwin/bin:/opt/bin:.; export PATH DBALIST="primary.dba@company.com,another.dba@company.com";export
for SID in `cat $ORACLE_HOME/sidlist`
do
cd $ORACLE_BASE/admin/$SID/bdump
if [ -f alert_${SID}.log ]
then
mv alert_${SID}.log alert_work.log
touch alert_${SID}.log
cat alert_work.log >> alert_${SID}.hist
grep ORA- alert_work.log > alert.err
fi
if [ `cat alert.err|wc -l` -gt 0 ]
then
mailx -s "${SID} ORACLE ALERT ERRORS" $DBALIST < alert.err
fi
rm -f alert.err
rm -f alert_work.log
done
Place the script in a crontab:
#########################################################
# Check Standby log file
#########################################################
9,19,29,39,49,59 7-17 * * 1-5 /dba/scripts/ckalertlog.sh
More Information
Note:180031.1 Creating a Data Guard Configuration (used as a reference material)
http://www.idevelopment.info/data/Oracle/DBA_tips/Data_Guard_9i/DG_1.shtml (used as a reference material)
Note:243709.1 Monitoring Physical Standby Progress (used as a reference material)
Note:232649.1 Data Guard Gap Detection and Resolution (used as a reference material)
Note:154488.1 Data Guard 9i Common Errors (used as a reference material)
Note:233261.1 Tuning SQL Apply Operations for Logical Standby
Note:214071.1 Creating a configuration using Data Guard Manager
Note:150584.1 Data Guard 9i Setup with Guaranteed Protection Mode
Note:240874.1 9i Data Guard Primary Site and Network Configuration Best
Note:239100.1 Data Guard Protection Modes Explained
Note:240875.1 Oracle 9i Media Recovery Best Practices
Note:241925.1 Troubleshooting 9i Data Guard Network Issues
Note:225633.1 Implementing SSH port forwarding with 9i Data Guard
Script to Collect Data Guard Primary Site Diagnostic Information (Note:241374.1)
Script to Collect Data Guard Physical Standby Diagnostic Information (Note:241438.1)
Script to Collect Data Guard Logical Standby Diagnostic Information (Note:241512.1)
Script to Collect Data Guard Logical Standby Table Information (Note:269954.1)
Troubleshooting Logical Standby (Note:215020.1)
Determining if SQL Apply Engine is Performing Full Table Scans (Note:255958.1)
All Docs in ML for DataGuard
http://metalink.oracle.com/metalink/plsql/ml2_documents.showDocument?p_database_id=NOT&p_id=185750.1
Applying Pacthes with Standby
For Physical (like this example) ML Note 187242.1
For Locigal ML Note 210989.1